What the hell is Lovelace?
Lovelace is a web application which allows free interaction with ChatGPT using Python's GPT4FREE library. The software is written in JavaScript, using NodeJS + Express + SocketIO on the server side and Vite + ReactJS on the Frontend.
The backend allows different clients to communicate with ChatGPT. If your purpose with Lovelace is to use it for your own ends or purposes, you can only mount the Backend server in your network and ignore the other side of the application, that is, the client; the backend allows its interaction through the API, or you can use the connection by WebSocket using some SocketIO client.
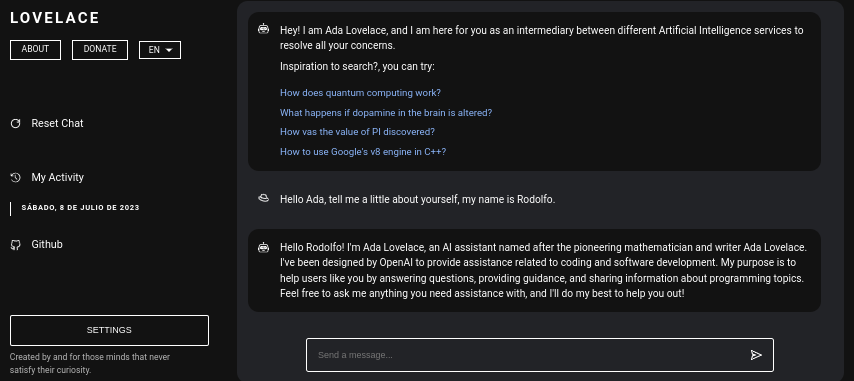
Table of Contents:
- Installing necessary dependencies before proceeding with the installation. [View]
- Cloning the Github repository that contains the Lovelace source code. [View]
- Knowing the functionality of the files and directories found within the cloned repository. [View]
- Running the backend server on the network. [View]
- Knowing the environment variables that the Lovelace Backend has. [View]
- Mounting the Lovelace Frotend built with Vite + React on the network. [View]
- Knowing and modifying the environment variables that the Vite + React application has (Frontend). [View]
- Modifying the host and port where the development server of the Vite + React web application (Frontend) will be mounted. [View]
- Why was Vite selected to build the software interface? [View]
- Internationalization within the web application, multiple languages under the same interface! [View]
- Learning to make requests to the API located on the backend server, in order to communicate with the AI. [View]
- Using WebSocket's to connect to the server using SocketIO and establish communication with the AI. [View]
- Getting to know some of the clients available from SocketIO in other technologies/programming languages. [View]
- Using the API to obtain the list of providers and their respective models available, both for requests to the AI through the API and WebSocket's. [View]
- An overview of the web application. [View]
- Knowing the main functionalities provided by the Lovelace web application. [View]
- Learning to use the settings menu provided by the web application and knowing each of its features. [View]
- Learning to use the history of interactions with the AI provided by the web application. [View]
- Partially knowing the design of the application on mobile devices. [View]
- Video-based example of the use of the web application on computers. [View]
- Video-based example of the use of the web application on mobile devices. [View]
Before you start the installation
Installing Lovelace on your computer or server is relatively simple, you shouldn't have any major complications in the process; however, before you start cloning the repository, make sure you have at least NodeJS v18.0.0 and Python v3.10.
Consider that, in case you do not have the required NodeJS version installed on your system, you can use the version manager NVM (Node Version Manager).
# Installing NVM on your system...
export NVM_DIR="$HOME/.nvm" && (
  git clone https://github.com/nvm-sh/nvm.git "$NVM_DIR"
  cd "$NVM_DIR"
  git checkout `git describe --abbrev=0 --tags --match "v[0-9]*" $(git rev-list --tags --max-count=1)`
) && \. "$NVM_DIR/nvm.sh"

# Once NVM has been installed, we proceed to install the specified NodeJS version (> 18.0.0)
nvm install 18.0.0
If you don't have Python v3.10 on your system, you might consider the following:
# (DEBIAN)
sudo add-apt-repository ppa:deadsnakes/ppa && sudo apt update && sudo apt install python3.10

# (MacOS)
brew install python@3.10
In the same way, consider having pip installed on your system, since it will be used when installing the necessary modules to be able to mount the backend server within the network.
curl https://bootstrap.pypa.io/get-pip.py -o get-pip.py
python3 get-pip.py
Now, assuming you have the aforementioned dependencies installed on your system, we can proceed to the next step...